Prefab housing is changing from a standard box into a configurable building system. Yet many buyers still ask, “can prefab houses be customized easily?” The practical answer is yes, when customization begins with a clear design brief, a suitable structural system, and realistic budget controls. Floor plans, window positions, insulation levels, kitchens, bathrooms, façades, and electrical layouts can often be adjusted before manufacturing begins. A useful design process may start with a simple sketch: a south-facing living room, a compact utility wall, and enough storage beside the entry door.
Industry evidence supports this approach. McKinsey & Company reported that modular construction can reduce project schedules by approximately 20 to 50 percent and lower costs by up to 20 percent in suitable conditions. These results are not automatic. Factory efficiency depends on repeatable components, accurate drawings, reliable suppliers, and early decisions. A late window change may affect wall panels, transport dimensions, and installation sequences. Small choices can become expensive changes.
Environmental performance also deserves attention. The 2023 Global Status Report for Buildings and Construction, published by UNEP and the Global Alliance for Buildings and Construction, stated that buildings and construction accounted for about 37 percent of global energy-related and process carbon dioxide emissions. Prefabrication may reduce material waste through controlled production, but it is not automatically sustainable. Transport distance, material selection, insulation quality, and future maintenance still matter. This guide explores practical customization methods, cost questions, and common design mistakes. Some recommendations may not suit every climate or supplier. Careful verification remains essential.
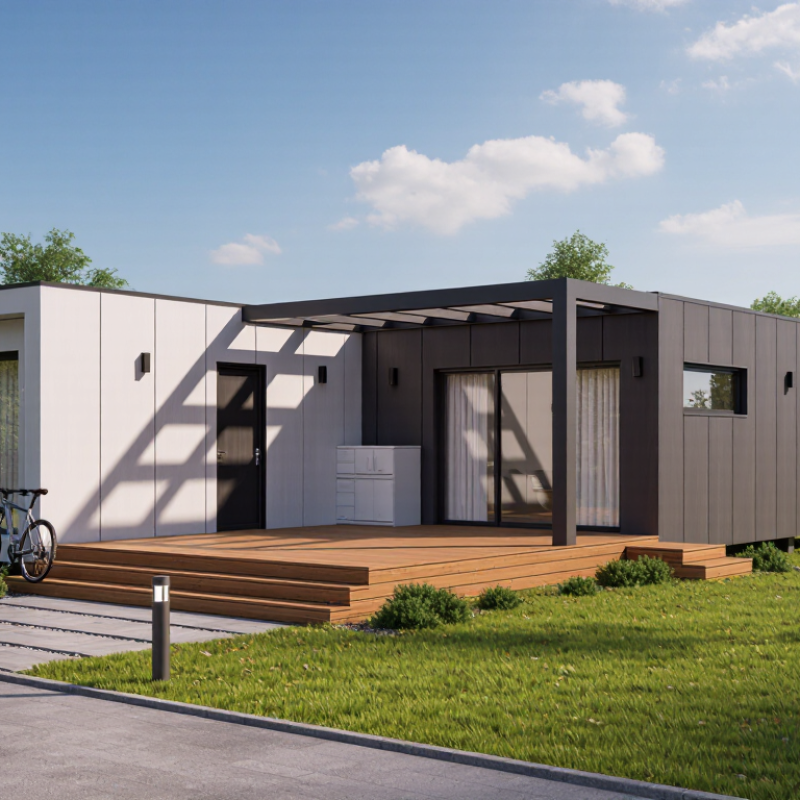
Prefab houses are built from coordinated components, not one inseparable box. The main parts include structural frames, wall panels, roof sections, windows, doors, and service routes. Electrical wiring and plumbing often travel through planned channels inside the walls. This makes customization easier before production begins. A larger kitchen window, extra storage wall, or wider doorway can be discussed during design reviews. Measure furniture carefully. A small error can change the entire room experience.
Customization should begin with the floor plan and daily routines. Open living areas may suit social households, while enclosed rooms provide better privacy. Insulation thickness, glazing type, ventilation, and roof overhangs also influence comfort. Interior choices include flooring, cabinets, lighting positions, wall colors, and bathroom fittings. Exterior options may include cladding textures, porch sizes, and shaded entrances. Keep service access in mind. Attractive finishes cannot compensate for difficult maintenance.
Technical coordination matters more than appearance alone. Moving a wall may affect beams, ventilation, or plumbing connections. Adding a heavy tile finish may require structural checking. Ask for component drawings, material specifications, installation tolerances, and a clear change schedule. Local building requirements should guide window sizes, fire safety, energy performance, and accessibility decisions. Some early ideas may prove impractical. That is normal. A careful revision is better than an expensive correction after manufacturing begins.
A prefab house becomes easier to customize when the layout starts with daily routines, not attractive floor plans. Mark the path from the entry to the kitchen, laundry room, bedrooms, and bathrooms. The National Association of Home Builders’ 2024 buyer-preference report lists laundry rooms, patios, walk-in pantries, and ceiling fans among highly requested features. These findings support practical planning. A laundry room near bedrooms can reduce carrying baskets across the house.
Keep plumbing zones close together when possible. Shared walls can reduce pipe runs, maintenance access, and construction complexity. Leave clear furniture zones before fixing room dimensions. A dining table needs movement space, not only its footprint. Test door swings with paper templates. Small errors become expensive after modules are manufactured.
Energy performance also depends on room placement. The U.S. Energy Information Administration reports that space heating and cooling represent a major share of household energy use. Place frequently occupied rooms within comfortable thermal zones. Add windows for daylight, but check glare and summer heat. A shaded south-facing opening may work better than oversized glass. This is easy to overlook. Accessibility deserves early attention, too. Wider circulation, a step-free entrance, and a future-ready bathroom can improve long-term usability. The AARP Home and Community Preferences Survey consistently shows strong demand for aging-friendly housing features. I would still recheck every measurement with the manufacturer, because a beautiful plan can fail at the connection points.
How to Customize Prefab Houses Easily
Selecting materials, finishes, colors, and exterior features becomes easier with a practical plan. Start with the local climate and the site’s natural surroundings. Humid areas need moisture-resistant cladding and carefully sealed joints. Dry regions may benefit from shaded windows and durable exterior coatings. Always check material samples outdoors, because sunlight changes their appearance.
Use one main exterior material, then add a smaller accent for contrast. Timber-style panels can soften a modern façade, while masonry or textured fiber cement can create visual weight. Choose flooring and wall finishes according to daily use, not only appearance. Matte surfaces often hide dust better, but they may require deeper cleaning after spills. I once preferred a pale finish for its spacious feeling, but it showed every mark near the entrance. That choice needed reconsideration.
Color decisions should connect the roof, windows, doors, and surrounding landscape. Warm neutrals usually age gently, while darker tones can make a compact house feel smaller. Request physical samples and view them during morning and afternoon light. For exterior features, consider covered porches, adjustable louvers, raised planters, and practical lighting. These details should support movement, shade, drainage, and privacy. Keep maintenance access in mind. A beautiful screen is less useful when nobody can clean behind it. Before ordering customized components, confirm dimensions, insulation needs, fire performance, and local approval requirements with qualified professionals.
How to Customize Prefab Houses Easily
A prefab house becomes easier to customize when utilities are planned before wall panels arrive. Create one accessible service core for plumbing, electrical lines, ventilation, and data cables. This reduces cutting, delays, and future repair costs. The International Energy Agency reports that buildings consume about 30% of global final energy. Efficient planning matters before installation begins.
Smart systems should support real household behavior, not create complicated controls. Use occupancy sensors, automated shading, leak detection, and room-based temperature control. The U.S. Department of Energy states that heat pumps can reduce electricity use for heating by about 50% compared with electric resistance systems. Add rooftop solar readiness, battery conduits, and high-performance insulation during customization. Retrofitting them later can be expensive and visually disruptive. A perfect automation plan is rarely perfect. Some residents still prefer manual switches.
Tips: Keep a printed utility map inside the service cabinet. Label every cable and shutoff valve. Install empty conduits for future upgrades. Ask an independent professional to check electrical loads, ventilation rates, and moisture control. The National Renewable Energy Laboratory notes that commissioning can reveal system faults before occupancy. Do not skip that inspection. Small errors, such as an unsealed pipe opening, can cause drafts, condensation, or hidden energy loss.
Customizing a prefab house begins with a careful review, not a glossy floor plan. I compare room dimensions, window positions, insulation ratings, plumbing routes, and site requirements. A 10-centimeter change can affect furniture, delivery clearance, and foundation work. Ask for revised drawings before approving anything. I once overlooked a shaded bedroom window. It looked minor. Later, the room felt colder than expected, so natural light deserves serious attention.
When ordering, request a written quotation with materials, transport, installation, taxes, exclusions, and payment stages. Confirm who handles permits and utility connections. Do not rely on verbal promises. Keep every revision dated and attached to the final agreement. Check door sizes against appliances, especially refrigerators and washing machines. A cheaper finish may also need more maintenance, which can change the real cost over time.
Installation depends on preparation. The foundation should be level, cured, and free from standing water before the modules arrive. On delivery day, inspect panels, windows, seals, and visible damage before signing. Use the approved drawings during assembly, then test plumbing, electrical points, ventilation, and drainage. Allow extra time for weather or transport delays. My biggest mistake was scheduling interior work immediately after placement. Small alignment adjustments delayed the flooring, and the rushed schedule created avoidable pressure. A patient inspection often prevents expensive corrections.
| Customization Stage | What to Review or Decide | Typical Practical Range | Documents or Information Needed | Recommended Checkpoint |
|---|---|---|---|---|
| 1. Define the Brief | Set the number of bedrooms, bathrooms, living areas, storage spaces, accessibility needs, and preferred architectural style. | Compact homes: about 40–90 m²; family homes: about 90–180 m²; larger designs: over 180 m². | Room list, household size, lifestyle requirements, budget range, and intended occupancy. | Confirm that every essential room has a defined purpose and approximate size. |
| 2. Review the Site | Check site access, slope, soil conditions, drainage, orientation, utilities, local planning rules, and available building area. | Transport routes commonly need adequate clearance for delivery vehicles; exact requirements depend on module size and local regulations. | Site survey, plot plan, utility locations, geotechnical information, photographs, and access measurements. | Obtain written confirmation that the selected design can be delivered and positioned on the site. |
| 3. Choose the Floor Plan | Compare room dimensions, circulation, window positions, ceiling heights, furniture layouts, and future expansion options. | Common ceiling heights are approximately 2.4–2.7 m, subject to local codes and the selected construction system. | Scaled floor plan, elevations, furniture plan, and orientation diagram. | Verify door swings, furniture clearances, daylight, ventilation, and accessible routes. |
| 4. Select Materials and Finishes | Choose exterior cladding, roofing, flooring, cabinetry, worktops, sanitaryware, paint colors, insulation, and window types. | Energy performance depends on the complete wall, roof, floor, window, and heating design rather than insulation thickness alone. | Finish schedule, samples, product specifications, color selections, and maintenance requirements. | Check durability, moisture resistance, fire performance, cleaning needs, and local compliance. |
| 5. Review Energy and Services | Confirm heating, cooling, hot water, ventilation, lighting, electrical outlets, water-saving fixtures, and renewable-energy provisions. | Solar capacity, heating load, ventilation rate, and equipment size must be calculated for the local climate and building design. | Mechanical and electrical layouts, energy calculations, appliance schedule, and utility requirements. | Ensure equipment locations allow servicing and that the electrical supply matches the planned loads. |
| 6. Confirm the Quote | Separate the base house price from site works, foundations, transport, lifting, permits, utility connections, taxes, and optional upgrades. | Site-specific items can vary substantially and should not be assumed to be included in the base package. | Itemized quotation, payment schedule, inclusions, exclusions, allowances, warranty terms, and change-order procedure. | Approve the final specification and price in writing before production begins. |
| 7. Place the Order | Sign the contract, submit required approvals, confirm production drawings, and agree on delivery responsibilities. | Production schedules vary by design complexity, approvals, materials, and factory workload; use the contractual schedule as the reference. | Signed contract, approved drawings, payment evidence, permits, site-readiness plan, and delivery contact details. | Freeze design changes only after reviewing the final drawings and service locations. |
| 8. Prepare the Foundation | Complete excavation, drainage, foundations, anchor points, utility ducts, temporary access, and site safety arrangements. | Foundation type may include slabs, piers, piles, or other systems, depending on soil, climate, structural design, and local codes. | Approved foundation design, inspection records, utility plans, and site-readiness checklist. | Measure foundation dimensions and anchor positions before delivery is scheduled. |
| 9. Arrange Delivery and Lifting | Coordinate transport permits, delivery timing, crane access, overhead clearances, weather conditions, and temporary road closures if required. | Crane capacity and lifting radius must be calculated by a qualified lifting professional for the actual module weight and site conditions. | Delivery plan, lifting plan, traffic arrangements, risk assessment, and emergency contacts. | Complete a final access inspection shortly before transport. |
| 10. Install and Connect | Position modules, secure structural connections, complete weatherproofing, connect utilities, and finish any on-site work. | Installation duration depends on module count, foundation readiness, weather, site access, and the scope of finishing work. | Installation drawings, connection details, inspection requirements, commissioning records, and completion checklist. | Inspect alignment, seals, connections, plumbing, electrical systems, doors, windows, and drainage. |
| 11. Complete Handover | Review defects, test systems, receive keys and manuals, confirm warranties, and record maintenance requirements. | Allow time for correcting outstanding items before final acceptance and release of any retention payment. | Completion certificate, inspection approvals, as-built drawings, warranties, manuals, and defect list. | Sign final acceptance only when agreed work is complete and documented. |
Note: Dimensions, schedules, permits, foundation requirements, transport conditions, and installation methods vary by location, design, construction system, and local building regulations. Confirm project-specific requirements with qualified professionals and the relevant authorities.
Start with daily routines, not an attractive floor plan. Mark paths between the entry, kitchen, bedrooms, bathrooms, and laundry room. This reveals awkward distances early.
Place it near the bedrooms when possible. Shorter routes make carrying baskets easier. A nearby utility area can simplify plumbing. I might still underestimate storage needs.
Keep frequently used rooms within comfortable thermal zones. Add windows for daylight, but check glare and summer heat. Shaded openings may outperform oversized glass. Easy to miss.
Leave movement space around furniture, not only furniture footprints. Test door swings with paper templates. Check hallway widths and furniture clearances twice. Small errors become costly.
Plan wider circulation, a step-free entrance, and a future-ready bathroom. These features support aging and changing mobility needs. Measure turning areas carefully. Good intentions are not measurements.
Create one accessible service core for plumbing, electrical lines, ventilation, and data cables. Keep plumbing zones close together. Shared walls can reduce pipe runs and maintenance work.
Choose systems that match household habits. Useful options include occupancy sensors, leak detection, automated shading, and room-based temperature control. Keep manual switches available. Complexity can frustrate people.
Add conduits for solar equipment, batteries, data cables, and other upgrades. Install strong insulation during customization. Later changes may disturb finished walls. Ask an independent professional to check electrical loads, ventilation, and moisture control. Do not skip commissioning.
Keep a printed utility map inside the service cabinet. Label every cable and shutoff valve. Check pipe openings for proper sealing. Small gaps can cause drafts, condensation, or energy loss. I would recheck everything.
Customizing a prefab house can be a straightforward and rewarding process when you understand its main components and available options. Start by reviewing the structural modules, wall systems, roofing, windows, doors, and interior spaces. Then plan a layout that matches your household’s routines, including the number and purpose of bedrooms, bathrooms, kitchen areas, storage spaces, and shared rooms. This careful planning helps ensure that the home is comfortable, practical, and suited to your daily needs. It also answers the common question: can prefab houses be customized easily? In many cases, yes, especially when choices are made early and coordinated clearly.
Next, select suitable materials, finishes, colors, flooring, cabinetry, lighting, and exterior details to create a personal style. You can also add plumbing, electrical systems, heating and cooling, smart-home features, insulation, solar-ready designs, and other energy-efficient solutions. Before construction begins, review every drawing, specification, cost, delivery detail, and installation requirement. A thorough final check reduces misunderstandings and helps the customized prefab house arrive ready for efficient assembly and comfortable living.

KS Housing